Showing posts with label diagram. Show all posts

Tuesday, December 17, 2013

1 Zener Precise Limiter Circuit Diagram

A limiter 1 Zener Precise Limiter Circuit Diagram that requires matched zener diodes can instead use one zener with a full-wave diode bridge. The circuit`s two limits are nearly equal when determined by the same zener—only two pairs of forward diodes need to be matched. For best results, an integrated quad of diodes can be used. But, after testing the circuit, four single controlled-drop diodes and four ordinary diodes gave about the same accuracy (better than 0.5%). 

 1 Zener Precise Limiter Circuit Diagram

1 Zener Precise Limiter Circuit Diagram

Because the limiting level can be adjusted, zener tolerance can be adjusted out. Gain stability can be optimized by connecting the inverting input to the first op amp to the output of the second to make the circuit inherently unity-gain. 

The zener voltage must be increased to 8.2 V to compensate for the two diode drops. Placing small capacitors across the resistors in the loop stabilized the circuit adequately and response is orders of magnitude faster than conventional circuits. Moreover, it`s limited primarily by the op amp`s slew rate.
{ Read More }


Sunday, October 6, 2013

RING BELL ELECTRONIC CIRCUIT USING NE555 DIAGRAM

RING BELL ELECTRONIC CIRCUIT USING NE555 DIAGRAM

This circuit produces oscillating frequency around 1kHz, and able to be converted by changing the value of resistor R1. The speaker will produce a long beep sound with 1kHz frequency. Here is the schematic :

Parts list :

  •     Resistor R1 : 10k ohm
  •     Resistor R2 : 56k ohm
  •     Capacitor C1-C2 : 0.01 uF
  •     Polar capacitor C3 : 1 uF/15V
  •     IC timer : NE 555
  •     Speaker : 8 ohm 0.5 W
  •     ON/OFF switch
  •     5-15V Power supply
{ Read More }


Tuesday, September 24, 2013

Usb Power Socket Circuit Diagram

Today, almost all computers contain logic blocks for implementing a USB port. A USB port, in practice, is capable of delivering more than 100 mA of continuous current at 5V to the peripherals that are connected to the bus. So a USB port can be used, without any trouble, for powering 5V DC operated tiny electronic gadgets. Nowadays, many handheld devices (for instance, portable reading lamps) utilise this facility of the USB port to recharge their built-in battery pack with the help of an internal circuitry.Usually 5V DC, 100mA current is required to satisfy the input power demand. Fig. 1 shows the circuit of a versatile USB power socket that safely converts the 12V battery voltage into stable 5V.
Circuit diagram:
Usb Power Socket Circuit Diagram

This circuit makes it possible to power/recharge any USB power-operated device, using in-dash board cigar lighter socket of your car. The DC supply available from the cigar lighter socket is fed to an adjustable, three-pin regulator LM317L (IC1). Capacitor C1 buffers any disorder in the input supply.Resistors R1 and R2 regulate the output of IC1 to steady 5V, which is available at the ‘A’ type female USB socket.
usb-power-socket-circuit-block-diagram1
Red LED1 indicates the output status and zener diode ZD1 acts as a protector against high voltage. Assemble the circuit on a general-purpose PCB and enclose in a slim plastic cabinet along with the indicator and USB socket. While wiring the USB outlet, ensure correct polarity of the supply. For interconnection between the cigar plug pin and the device, use a long coil cord as shown in Fig. 2. Pin configuration of LM317L is shown in Fig. 3.
Author : T.K. Hareendran - Source : EFY Mag
{ Read More }


Saturday, September 21, 2013

Fuse Box BMW 540i 1993 Diagram

Fuse Box BMW 540i 1993 Diagram - Here are new post for Fuse Box BMW 540i 1993 Diagram.

Fuse Box BMW 540i 1993 Diagram


Fuse Box BMW 540i 1993 Diagram

Fuse Panel Layout Diagram Parts: blower relay, crash control module, late production, auxiliary water pump relay, horn relay, jumper plug horn telephone, starter relay, compressor control relay, washer pump relay, hazard flasher relay, unloader relay, check control module, lamp control module
{ Read More }


Saturday, July 13, 2013

Simple 3 Way Active Crossover Circuit Diagram

This is the Simple 3-Way Active Crossover Circuit Diagram with linear phase response. The problems that exist at common crossover circuit is known. The low pass filter causes a delay in the signal. Unlike the high-pass filter causes a head in the signal passing through it. Thus the frequency separation created some problems such as:
  1. Signals of the two filters are mutually exclusive
  2. The phase shift between the filter affects the radiation
  3. The radiation pattern depends on the frequency
The crossover circuit tries to solve many of the problems mentioned above and based on a study of S. Lipshitz and J.  Vanderkooy, published in the JAES (Journal Audio Engineering Society). A lattice separation uses a linear phase low-pass section with the help of a time delay circuit and a circuit removal gives the output signal with high-pass filter characteristics. The time delay is not constant over the entire frequency range, but changing very slowly and mainly there are phase differences between signals of the two charges, not even close to the crossover.

Simple 3-Way Active Crossover Circuit Diagram

Simple 3-Way Active Crossover Circuit Diagram

The circuit consists separation as shown in block diagram [Fig.2] two low pass filters of fourth grade, -24db/oct for a line of low-frequency signals and one for the high frequency separation. In the same frequencies operate both units delay time T1 (for low frequency F1) and T2 (for high frequency F2) and give the same phase characteristics of the low pass section.


The delay circuit T1 simulates the time delay introduced by low-frequency filter LPF1, while T2 simulates the time delay introduced by low-frequency filter LPF2 that exists in the line of midrange. Then the signal from the low pass filter removed [IC7A-B] of the signal has been delayed, a clear signal that the characteristics are the same as a signal that has passed through a high pass filter. At the exit of each line is a trimmer with which we can adjust the level between the levels of loudspeakers. The power circuit is a well-stabilized voltage + /-15V. The use of meshed split fourth order Linkwitz forcing crossovers be located at-6db [Fig.3].


The above picture shows the main circuits and the necessary formulas for calculating the low pass filters as well as trusses time delay. There is also an example calculation for crossovers and 200IZ 3KIZ that will help calculate and adjust to your needs. The circuit derived from a relevant article of the magazine Elektor. 

Components List:
R1,16 = 100Kohms
R2,3,4,5 = 56Kohms
R6,27 = 37.5Kohms[33K+4.7K]
R8,9,12,13,14 = 10Kohms
R10,28 = 75Kohms (150K//150K)
R11,29 = NC
R15 = 56.3Kohms
R17 = 12Kohms
R18,19,20,21,22 = 10Kohms
R23,24,25,26 = 37.5Kohms [33K+4.7K]
R30,31,32,33,34,35,36 = 10Kohms
R37,38,39,40,41,41 = 10Kohms
R42,43,44 = 47Kohms
R45,46 = 47 ohms
TR1,2,3,4 = 47Kohms trimmer or pot.
C1,34,35 = 2.2uF 100V MKT
C2,3,7,8,14,15,18 = 47nF 100V MKT
C4,5,6,9,10,11,16,17 = 10nF 100V MKT
C12,13,20,21,22 = 1nF 100V MKT
C19,23,24,30,31,32,33 = 47nF 100V MKT
C25,26,27,28,29 = 1nF 100V MKT
C36,37 = 1uF 100V MKT
C38,39 = 47uF 25V
IC1 = TL071
IC2,3,4,5,6,7 = TL072,NE5532
All the resistors is 1/4W 1% metal film


Sourced by Elektor
{ Read More }


Thursday, July 11, 2013

230 V AC To 400 V DC Power Supply Circuit Diagram


Description

               A lot of students are who dont know how to convert 230 volt AC to 400 DC. So today I am published   230 V AC to 400 V DC circuit diagram on my blog. Working principle of this circuit diagram is very simple. You already knew the working principle of a bridge rectifier. This circuit is same as bridge rectifier and the working principle is also same. The fuse is used to protect the circuit, if the current is greater than 1 A.


Parts List

Component No:Value
F11 A
B1IN4007 
C1470MF/450V 
V1230 V AC 


Source by : link
{ Read More }


Wednesday, July 10, 2013

Touch Sensitive Alarm Circuit Diagram


Description

                Circuit showing a Touch Sensitive Alarm .Here i have used bc 548 transistor for switching and bc 107 for sound generation
.You need a power supply

Click here to view the power supply circuit diagram

Components Required

 Resistor

            680R ,100 K

 Transistor

             BC 548, BC 107 - 2

Loud Speaker

Copper plate
Source by : http://www.electronics-circuits.in/2012/03/touch-sensitive-alarm-circuit-diagram.html#more
{ Read More }


LA4440 Stereo Amplifier Circuit Diagram

LA4440 is a dual channel audio amplifier IC. It can be used in two modes; one is Stereo amplifier and another Bridge amplifier mode. The LA4440 is a monolithic linear IC from Sanyo. Here I give the both circuit mode of amplifier using IC LA4440.

When the IC LA4440 is Stereo mode in the circuit, its output power is 6w+6w. In stereo mode use two pieces speaker of 2Ωto8Ω.

LA4440 Stereo Amplifier Circuit Diagram

C10 is filter capacitor used to reduce the ripple of supply voltage. Don’t decrease the value of capacitor C6&C7 less than 100uF, 10v, it may causes of the output at low frequencies goes lower. The pin-6 of LA4440 amplifier circuit  is audio input pin; it used in stereo amplifier mode but in bridge mode it is grounded. C8&C9 are polyester film capacitor used to preventing oscillation, and R1&R2 used for the same reason as filter resistor. Though the maximum supply voltage for both circuit of amplifier is 18V but we recommend to use a 12V,3A power supply. Use a good quality heat sink with LA4440.

I think here you see little comparison between stereo and bridge amplifier of LA4440. If you want to make this amplifier project, then I recommend you the bridge one. I think it is ideal for a beginner. And I love its wattage rather than Stereo mode. There is also a possibilities as I say, make two copies of circuit of bridge amplifier for stereo, it will give you 19w+19w of audio power output.
{ Read More }


Saturday, July 6, 2013

Dark Sensitive Power Switch Circuit Diagram Using LDR


Description

Circuit showing a Dark Sensitive Power Switch .Here we have used a ldr and a ordinary transistor for making this circuit
.Connect any 230 volt equipment at the load .You need a 9 volt power supply
Components Required

         Resistor

                     10 k , 680 R

          Transistor

                        BC 548

          Diode

                   IN 4007

         Relay

         LDR
{ Read More }


Clap Switch Circuit Diagram

Here’s a clap switch free from false triggering. To turn on/off any appliance, you just have to clap twice. The circuit changes its output state only when you clap twice within the set time period. Here, you’ve to clap within 3 seconds. 

The clap sound sensed by condenser microphone is amplified by transistor T1. The amplified signal provides negative pulse to pin 2 of IC1 and IC2, triggering both the ICs. IC1, commonly used as a timer, is wired here as a monostable multivibrator. Trigging of IC1 causes pin 3 to go high and it remains high for a certain time period depending on the selected values of R7 and C3. 

This ‘on’ time (T) of IC1 can be calculated using the following relationship: T=1.1R7.C3 seconds where R7 is in ohms and C3 in microfarads. On first clap, output pin 3 of IC1 goes high and remains in this standby position for the preset time.Also, LED1 glows for this period. The output of IC1 provides supply voltage to IC2 at its pins 8 and 4.
Circuit diagram :
Clap Switch  Circuit Diagram
Clap Switch Circuit Diagram

Now IC2 is ready to receive the triggering signal. Resistor R10 and capacitor C7 connected to pin 4 of IC2 prevent false triggering when IC1 provides the supply voltage to IC2 at first clap. On second clap, a negative pulse triggers IC2 and its output pin 3 goes high for a time period depending on R9 and C5.

 This provides a positive pulse at clock pin 14 of decade counter IC 4017 (IC3). Decade counter IC3 is wired here as a bistable. Each pulse applied at clock pin 14 changes the output state at pin 2 (Q1) of IC3 because Q2 is connected to reset pin 15. The high output at pin 2 drives transistor T2 and also energizes relay RL1. LED2 indicates activation of relay RL1 and on/off status of the appliance. A free-wheeling diode (D1) prevents damage of T2 when relay de-energizes.
 
 
http://streampowers.blogspot.com/2012/06/clap-switch-circuit-diagram.html
{ Read More }


Wednesday, June 12, 2013

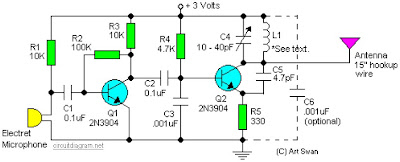
Sensitive FM Transmitter circuit diagram

Sensitive FM Transmitter circuit diagram

Simple and easy build of FM transmitter circuit. The circuit only require 2 transistors.


Circuit Notes:
Typically the default for the capacitors model is ceramic, preferably the npo 1% type or equivalent. However , generally almost nothing critical right here. Work with any capacitor you’ve laying arround, but DO NOT use any electrolytic or tantalum capacitors. Only in case you intend to apply this circuit outside the home you may need to use capacitores which have more temperature stability.

{ Read More }


Tuesday, June 4, 2013

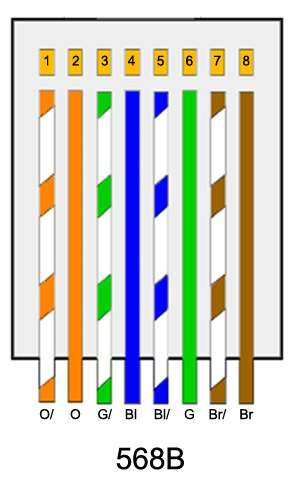
Indeximages Rj45 Wiring Diagram Files

Rj45 Wiring Diagram on Index Of  Images Rj45 Wiring Diagram Files
Index Of Images Rj45 Wiring Diagram Files.


Rj45 Wiring Diagram on Cat5 Socket Wiring Diagram   Reviews And Photos
Cat5 Socket Wiring Diagram Reviews And Photos.


Rj45 Wiring Diagram on Welcome To Tutor Piggy Blogspot Com  Rj45 Wiring Diagram
Welcome To Tutor Piggy Blogspot Com Rj45 Wiring Diagram.


Rj45 Wiring Diagram on And Solutions Utp Stp Rj45 Wiring Diagram 568a 568b Standard
And Solutions Utp Stp Rj45 Wiring Diagram 568a 568b Standard.


Rj45 Wiring Diagram on Rj45 Wiring Diagram T568a
Rj45 Wiring Diagram T568a.


Rj45 Wiring Diagram on Rj45 Socket Wiring   Reviews And Photos
Rj45 Socket Wiring Reviews And Photos.


Rj45 Wiring Diagram on Diagram Of How Rj45 Socket Wiring Shouild Be Terminated Wiring Diagram
Diagram Of How Rj45 Socket Wiring Shouild Be Terminated Wiring Diagram.


Rj45 Wiring Diagram on Wiring Diagram
Wiring Diagram.


Rj45 Wiring Diagram on Order Of The Bath    Churchtech
Order Of The Bath Churchtech.


Rj45 Wiring Diagram on Rj45 Cat  5 Wiring Diagram For Straight Through Cable
Rj45 Cat 5 Wiring Diagram For Straight Through Cable.


{ Read More }


Find 1995 740il Series Electrical Wiring Diagram Pass

Electrical Wiring Diagrams on Vulcan Vn750 Electrical System And Wiring Diagram   Circuit Schematic
Vulcan Vn750 Electrical System And Wiring Diagram Circuit Schematic.


Electrical Wiring Diagrams on 250 And 525 Sx  Mxc  Exc Electrical System And Wiring Diagram Here
250 And 525 Sx Mxc Exc Electrical System And Wiring Diagram Here.


Electrical Wiring Diagrams on 1991 Toyota Camry Electrical System Wiring Diagram Download   Document
1991 Toyota Camry Electrical System Wiring Diagram Download Document.


Electrical Wiring Diagrams on Gfci Outlet Wiring Diagram   Pdf  55kb
Gfci Outlet Wiring Diagram Pdf 55kb.


Electrical Wiring Diagrams on Find The 1995 Bmw 740il Series Electrical Wiring Diagram Here  Pass
Find The 1995 Bmw 740il Series Electrical Wiring Diagram Here Pass.


Electrical Wiring Diagrams on 1991 Toyota Corolla Electrical System Wiring Diagram Download
1991 Toyota Corolla Electrical System Wiring Diagram Download.


Electrical Wiring Diagrams on Here Is An Example Of An Electrical Blueprint
Here Is An Example Of An Electrical Blueprint.


Electrical Wiring Diagrams on According To Wikipedia Org  The 1973 Ford Torino Were Available In 7
According To Wikipedia Org The 1973 Ford Torino Were Available In 7.


Electrical Wiring Diagrams on 1988 Daihatsu Charade Electrical Wiring Diagram   Circuit Schematic
1988 Daihatsu Charade Electrical Wiring Diagram Circuit Schematic.


Electrical Wiring Diagrams on Bmw 2 Series Electrical System And Wiring Diagram
Bmw 2 Series Electrical System And Wiring Diagram.


{ Read More }


Sunday, June 2, 2013

Cat5 Wiring Diagram Full Versionphotography

Cat5 Wiring on Cat3 Cat5 Utp 25  50  100 Pair Lan Cable   China Cat3 Cat5 Utp 25 50
Cat3 Cat5 Utp 25 50 100 Pair Lan Cable China Cat3 Cat5 Utp 25 50.


Cat5 Wiring on Here You Can See The Cat5 Wiring
Here You Can See The Cat5 Wiring.


Cat5 Wiring on Cat 5 Wiring
Cat 5 Wiring.


Cat5 Wiring on Coloured Cables As These Are Usually Cross Over Cables And Are Not
Coloured Cables As These Are Usually Cross Over Cables And Are Not.


Cat5 Wiring on Cat5 Lan Cable   China Network Cable Cat6 Lan Cable
Cat5 Lan Cable China Network Cable Cat6 Lan Cable.


Cat5 Wiring on Category 5 Patch Cable In T568b Wiring
Category 5 Patch Cable In T568b Wiring.


Cat5 Wiring on Cat5 Wiring Diagram Pdf Pdf Full Version   Photography
Cat5 Wiring Diagram Pdf Pdf Full Version Photography.


Cat5 Wiring on Santomieri Systems   Cat 5 Rj45 Wire Diagrams
Santomieri Systems Cat 5 Rj45 Wire Diagrams.


Cat5 Wiring on Quickand Dirty Cat 5 Wiring Howto
Quickand Dirty Cat 5 Wiring Howto.


Cat5 Wiring on How To Make A Cat 5 Cable
How To Make A Cat 5 Cable.


{ Read More }


Friday, May 31, 2013

Light Outlet Switch Wiring Diagram

Light Switch Wiring on Light Switch In Your Home    By Tara Gilbert Wiring A Light Switch Is
Light Switch In Your Home By Tara Gilbert Wiring A Light Switch Is.


Light Switch Wiring on Light With Outlet 2 Way Switch Wiring Diagram
Light With Outlet 2 Way Switch Wiring Diagram.


Light Switch Wiring on How To Wire A Switch   Switch And Light At End Of Circuit
How To Wire A Switch Switch And Light At End Of Circuit.


Light Switch Wiring on Like The Diagram Above  Power Switch Switch Light
Like The Diagram Above Power Switch Switch Light.


Light Switch Wiring on Way As It Is The Easiest Light Switch Wiring Scenario
Way As It Is The Easiest Light Switch Wiring Scenario.


Light Switch Wiring on How To Install Light Switches   Hometips
How To Install Light Switches Hometips.


Light Switch Wiring on How To Wire A Switch   Light Then Switch At End Of Circuit
How To Wire A Switch Light Then Switch At End Of Circuit.


Light Switch Wiring on Light Switch Wiring Diagram
Light Switch Wiring Diagram.


Light Switch Wiring on Light And Outlet 2 Way Switch Wiring Diagram
Light And Outlet 2 Way Switch Wiring Diagram.


Light Switch Wiring on End Of The Corridor And You Want To Switch Off The Light The Switch
End Of The Corridor And You Want To Switch Off The Light The Switch.


{ Read More }


IconIconIconFollow Me on Pinterest